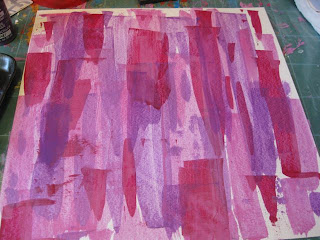
Creating your own scrapbooking backgrounds
By Michelle Brown
www.MixedMediaArt.net
Creating your own scrapbooking backgrounds is fun and easy to do. It is easy way to have a few paints and chipboard cutouts on hand and you can create our own unique backgrounds with matching embellishments.
While there are many ways of painting backgrounds, using the credit card painting technique is my favourite because it is quick and easy. I have developed this technique based on inspiration from Michelle Ward's GPP Street Team Crusades No. 55 Disappearing Act [http://michelleward.typepad.com/how_cool_is_that/2011/09/crusade-no-55-disappearing-act.html] Let's get started.
Tools & materials
To create our own scrapbooking background we need to gather our supplies together:
- a few pieces of 12" x 12" cardboard (or your preferred size),
- two matching coloured paints and a white paint,
- one or two old credit cards or other plastic card,
- paint pallet or plastic plate
- paintbrush and jar of water
- foam stamps
Process
1. Cover your table with plastic sheet or scrap paper. Have your cardboard ready and organise a space to dry each sheet once painted. Once we get started we can get through a few sheets pretty quickly.
2. Onto your paint pallet, place a dime sized dob of each paint. Mix one colour with a little white.
3. Use the paint brush to add a little paint onto the credit card. Hold the card firmly with one hand and scrap the paint with the credit card down the page. Once you get t the bottom, lift the credit card up and scrap another strip of paint. Repeat until the page is covered or you need more paint. It is okay to leave spaces and have different thickness; that adds to the charm of the background.
4. Leave page to dry while you clean the credit card (or use the second one). Take your second colour and repeat the paint scraping process. You can fill in the gaps or colour over the first colour. Just have fun with it and create with abandon.
5. Add a little of the third, lighter colour. When you are happy with it, set page aside to dry and create another page.
6. When all of the page backgrounds are painted, we can now add some features to the pages. Using the same paint colours, add paint to a foam stamp You can use one colour or add all three. Stamp pattern onto your background. Add until the paint fades and turn the stamp around and stamp again. You can get two or three good stamps before you need to apply more paint.
Don't worry that you can't see all of the detail; again that adds to the charm of the backgrounds.
7. Repeat with your other pages. Leave to dry. Now you can paint any chipboard embellishments that you may want to use to match your painted background.
This technique can be used to add lots of paint very quickly to many different projects; altered books, art journals or handmade books are just a few ideas.
----------------------------------------------------------------------------
Bio:
Michelle Brown is passionate about mixed media art and enjoys sharing her knowledge and techniques with you to allow you to express your own creativity. Michelle understands that many of us have an inner need to create. By learning a few basic techniques the amazing world of mixed media art is accessible to everyone! Located in Melbourne, Australia she can be contacted through www.mixedmediaart.net


A new designed plastic card i can never seen before the searching OF YOUR BLOG ,It's looks nice and creative.......
ReplyDeletePlastic Card
Plastic cards